How to Use Grandstream Device Management System
This blog was originally posted on Grandstream.com
Brian Van Meter, Marketing Manager
Grandstream Device Management System (GDMS) empowers installers with a cloud-based solution to easily manage all of their Grandstream unified communications and networking deployments before, during, and after the project. Recently, GWN.Cloud was integrated into GDMS, enabling users to manage a complete Grandstream portfolio deployment from one account. Grandstream Device Management System not only enables system integrators and IT teams to manage the entirety of a solution from the cloud but also expands that deployment network to remote employees or satellite offices by utilizing UCM RemoteConnect. Within this blog post, we’ll discuss an introductory overview into GDMS and how it provides game-changing configuration and management solutions. To get started, create an account on GDMS.

Getting Started – Deployment Organization
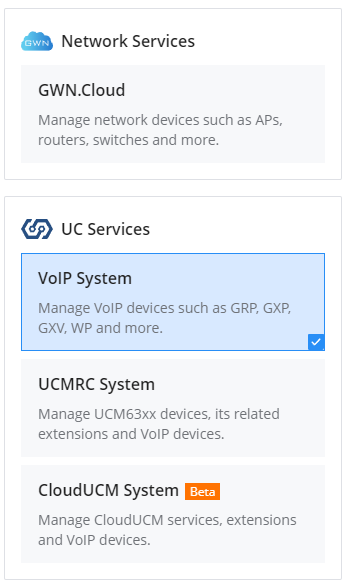
Upon logging on to the Grandstream Device Management System portal, you’ll notice that you can access either the unified communications service side of the platform or the GWN.Cloud side at any time. You can seamlessly switch between them by clicking on the menu item at the top left of the portal. Between the two systems, you’ll find the following.
Unified Communications Services: 
- VoIP System Management
- UCM RemoteConnect
- Cloud UCM Currently in Beta
Network Services:
- GWN.Cloud System Management
The key function to be familiar with before managing an installation via Grandstream Device Management System is the ability to create deployment categoriees for device management and organization. System integrators can separate customer organizations within the Grandstream Device Management System by utilizing a system of sites and networks. Child Sites’ that are subordinate to ‘Parent Sites’ can be created for more complex networks. It is important to always create a deployment before importing and adding VoIP or GWN networking devices.
Within the UC side of GDMS these deployment groupings are called sites and on the GWN portion, they are called networks. Keep in mind that sites/networks don’t have to be physical locations and are used to organize devices in whatever categories are appropriate. It could be a specific subscription type for SIP/ITSP services, a department within a company, or a group of Wi-Fi access points. Sites can easily be created in the VoIP system of the portal by using the “Sites” menu option, while networks are managed via the GWN.Cloud platform’s “Deployment” menu option.
Unified Communications Management on GDMS
Once a deployment site has been created, endpoint devices and an IP PBX can be added and associated with the site. For more information and steps on adding VoIP devices to a site on GDMS. Once this is done, the next step is customizing the configuration templates for the endpoint devices that are being deployed based on a client’s needs. These templates are essentially configuration files that can be pushed in bulk to endpoint devices within the deployment site. Once a configuration template is created and associated with a device, it will automatically be pushed to the device when it is brought online and connected to the internet. There is also the option to manually push configuration templates at any point, which is particularly useful if deployments need to be revised and adjustments made to the phones. It is important to know the difference between the 3 configuration template options.
Model: When configuring by model, an installer first chooses the model that they wish to configure and chooses to associate it with a specific, several, or all sites. The template then needs to be named to keep the configurations organized. When the devices within the specified site(s) that share that model type are brought online for the first time, the GDMS will push the configuration template to the devices automatically.
Group: The group option enables bulking similar model types and pushing one configuration template to all of them. From there, it is possible to customize a configuration template and then edit it. When using this configuration option there are specific model categories that have devices that can be chosen and edited, such as DP DECT phones, HT ATAs, and GXP/GRP phones. Bulk configuration templates may have feature options that aren’t available on some of the devices selected. These feature options will not be pushed to those specific devices since they are unsupported.
CNF Template: Finally, it is possible to import premade configuration files for specific devices. Once that specified configuration file is uploaded and related to the device, it can be pushed out through the GDMS portal. The uploaded file must be in XML format and named as the device’s MAC address.
When it comes to managing a UC site’s UCM6300 IP PBX, this can be done through Grandstream Device Management System through UCM RemoteConnect. From the GDMS dashboard, navigate to the left bar menu and click on the “UCMRC” tab. There are three options.
- UCM Device: Add, configure, and manage UCM6300 IP PBXs
- UCM Backup: Backup UCM configurations to ensure easy rollbacks of any
- UCM6300 IP PBX Call Quality: Monitor call quality of remote VoIP devices that are using UCM RemoteConnect’s NAT firewall traversal to connect to a central UCM6300 IP PBX
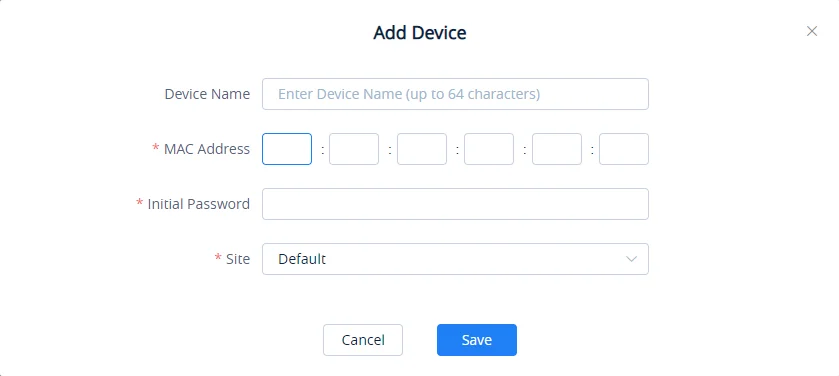
To add a UCM6300 IP PBX the device’s name (used for organizational purposes), MAC address, initial password, and desired Site are required. A UCM’s MAC address can be found either on the device’s physical label or within the UCM’s web GUI under the System Status > System Information > Network page. For more information on utilizing UCM RemoteConnect. The UCM’s initial password is the randomized original password assigned to every UCM6300 IP PBX, which can be viewed via the UCM’s LCD or on the UCM’s label. Once this information is provided, a GDMS Site must be selected to associate the IP PBX to.

GWN Management on GDMS
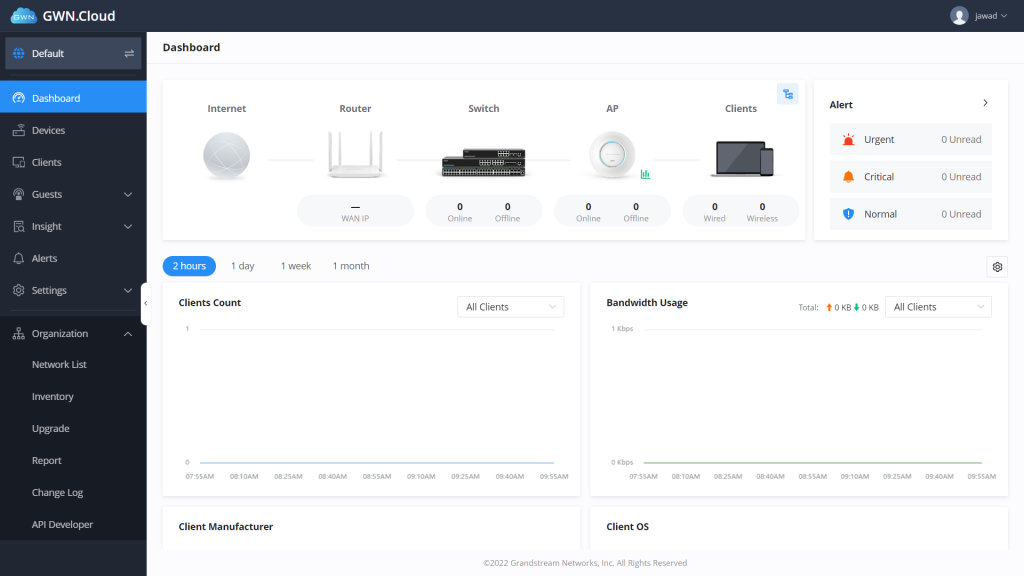
Once you have access to GDMS, the GWN platform can be accessed by clicking the menu in the top left of the browser and choosing GWN.Cloud. From here, the following menu items can be used to manage all aspects of the networking deployment:
- Network List: At the top of the menu list is the current deployment/network site that is being managed. You can use this button to change from one of your deployment sites to the next.
- Dashboard: The dashboard is the default menu item that is displayed whenever you sign in. It provides an overview of the deployment that is being viewed and includes a high-level count of online/offline devices in the selected deployment, client count, bandwidth usage, client statistics, new sessions by SSID, and more.
- Devices: One of the most important menu items, the devices tab is where you can add, view, and edit devices that are deployed on a network. All the devices within the network will be presented in the table in this tab, along with their MAC address, model, IP address, IPv6 address, firmware, running time, and usage. Clicking further into the device details will provide menu options to view the GWN product’s usage overview, info details, debug features, and configuration settings.
- Clients: The clients option will provide a list of all devices that are currently connected to a network. From this table, you’ll see the client’s hostname, the connection type, SSID, IP address, associated devices they’re using for the connection, and total connection time. You can click on each device to adjust their hostname, block the client, set bandwidth rules, DHCP static IP address binding, and also see usage statistics and client information details.
- Guests: A feature specific to voucher captive portals, a voucher group can be made to allow guests to log in via printable vouchers. This supports custom voucher validity times, rate limits, and traffic limits.
- Map and Floor Plans: This feature enables the user to create a floor plan to strategize the location of GWN access points.
- Insight: Insight provides two major features for network optimization; site surveying and a network topology creator.
- Alerts: The alerts tab provides a complete list of all alerts that have happened within a deployment, including the alert details, type, level, and time. No alerts will be generated here until they are set up in this menu using the Alert Settings button, where you can then define the system, performance, security, and network alerts.
- Settings: Settings is another vital menu to become familiar with. You will find configuration settings for the chosen network’s Wi-Fi/SSID connections, LAN routing, WAN routing, VPN management, traffic management, firewall & security settings, profiles for setting up additional network admins, and general system configurations.
- Organization: The final menu item, Organization is where you go to create new network deployments, view all devices you have deployed across all your networks, upgrade the firmware of your products, and generate helpful usage reports. The organization menu item is not network-specific like our other menu items and is a helpful item for viewing and managing your GWN products across all your clients’ various sites and deployments.
For more information on GWN device management and creation,

To create a network within the GWN.Cloud platform of GDMS, click on the Deployment button that was mentioned above and choose Create Network. This network will house the deployment’s GWN devices, settings, configurations, client information, and more. Typically, a network will contain the GWN devices being deployed for a specific business or site, however, it can be set up in any way you’d like to group GWN devices. Once the network is saved, go back to the network list and choose the network name. With the new network selected, all the above menu items will reflect the clients and devices within that network.
More Detailed Utilization of GDMS
With both the site and network created across Grandstream Device Management System, full portfolio deployments of Grandstream devices can begin to be configured and managed from one central account. For more information on configuring VoIP devices and UCM IP PBXs via GDMS, For information on managing GWN networking devices via GDMS.


